June, 2026
Home › Financial Automation › Banking Infrastructure for Automation › How to Set Up Your Bank Accounts So Money Moves Without You
What You Need to Know
— A hands-off money system requires three accounts at two institutions, all connected and configured in the right sequence before any automation is activated.
— Setup takes one to two weeks of elapsed time with roughly three hours of active work — most of the time is waiting for account verification and transfer testing.
— The setup sequence matters: open the savings account first, then the bills account, then configure autopay, then set up transfers, then verify everything works before relying on it.
— After setup, the system requires one 15 to 20 minute monthly review and no other active management under normal conditions.
— The most common setup mistake is moving autopay to the bills account before verifying the funding transfer works — always verify the transfer chain before migrating bills.
The goal of an automated banking system is simple: money leaves the income account and arrives in the right account without you doing anything. Bills are funded. Savings grow. Spending money is available. The entire distribution happens automatically within 24 hours of each paycheck, every pay period, without a single manual decision.
Getting to that steady state requires one-time setup work. The setup is not complicated but it has a specific sequence, and the sequence matters. Accounts that open in the wrong order, transfers configured before autopay is migrated, or automation activated before the buffer is in place all produce failures that are more disruptive than helpful.
This is the complete setup guide for bank accounts that move money automatically — every step in the right order with the verification checks that confirm each step worked before the next one begins.
What You Are Building
Before any account is opened, the complete picture of what you are building:
The Complete Account Architecture
Account A — Spending Checking (primary bank, your existing account): Income lands here. Automated transfers to B and C execute one day after deposit. Debit card lives here. Balance after transfers = genuine spending money.
Account B — Bills Checking (primary bank, new account): Receives transfer from A on payday. All fixed obligation autopay draws from here. No debit card. No manual purchases ever.
Account C — High-Yield Savings (separate institution, new account): Receives savings contribution transfer from A on payday. Emergency fund and goals accumulate here. No debit card. Transfer friction protects it.
Two institutions. Three accounts. Every dollar allocated before any spending decision is made.
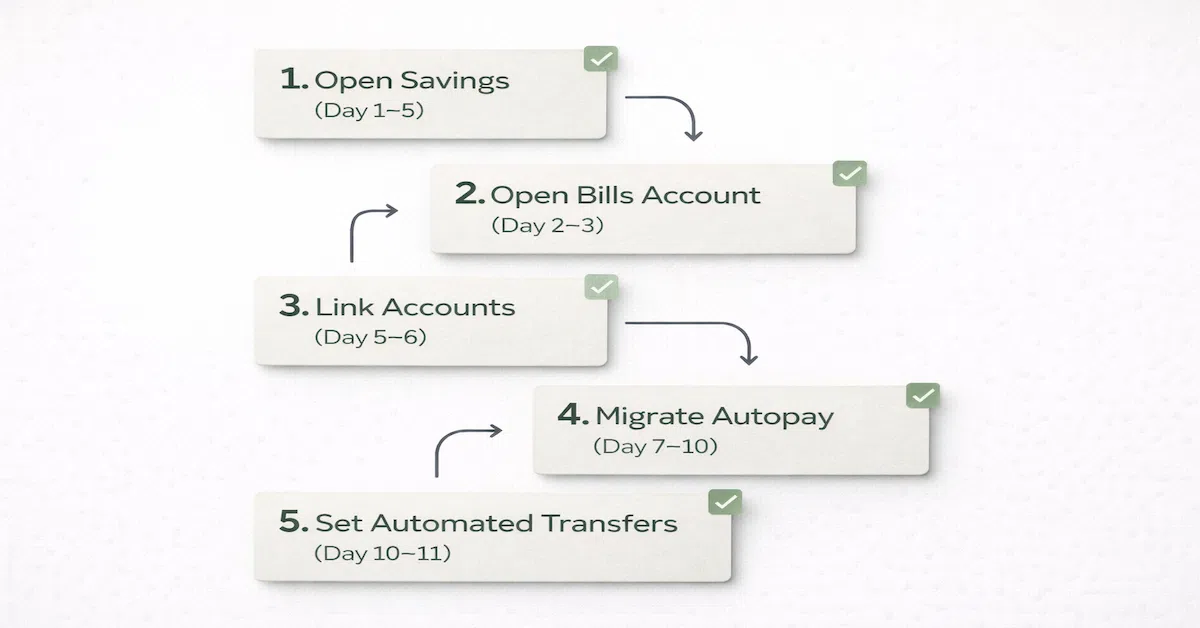
Step 1: Open Account C First (Days 1 to 5)
The high-yield savings account at a separate institution takes the longest to open and verify. Starting here means the verification process runs in the background while the other steps proceed.
Select a no-fee high-yield savings account at an online bank. The criteria: FDIC-insured, no monthly fees, no minimum balance requirement, and competitive interest rate. Verify FDIC insurance status before opening. The application typically takes 10 to 15 minutes online and requires your Social Security number, a government-issued ID, and funding from an existing account (usually $1 minimum).
After opening, the institution will send micro-deposits to your existing account for verification — two small deposits under $1.00 that you confirm in the app or website. This takes two to three business days. Do not proceed to account linking with your primary bank until these deposits are confirmed.
Verification check: Account C is open, funded with the initial deposit, micro-deposits confirmed, and account is fully accessible. ✓
Step 2: Open Account B (Day 2 to 3)
While Account C verification is in progress, open Account B at your primary bank. This is a second checking account at the institution where your existing spending account lives. Most banks allow same-day online opening with no additional documentation if you are already a customer.
Name the account clearly — most banks allow custom nicknames. "Bills" or "Fixed Expenses" is sufficient. Do not order a debit card for this account. If the bank automatically issues one, activate it, then immediately cut it up or call to deactivate it.
Seed the account with the initial buffer amount — 10 to 15 percent of your monthly fixed obligations — by transferring from Account A. This buffer must be in place before any bills autopay from this account.
Verification check: Account B is open at your primary bank, named clearly, no active debit card, buffer amount transferred and confirmed. ✓
Step 3: Link Account C to Account A (Day 5 to 6)
Once Account C micro-deposits are confirmed, link Account C to Account A (your primary bank's spending account) for external transfers. Log in to your primary bank and add Account C as an external account using Account C's routing number and account number.
Your primary bank may initiate its own micro-deposit verification to confirm the external account. This adds one to two more business days. Some banks use instant verification via login credentials to the external institution instead, which completes immediately.
Test the link with a small transfer — $5 or $10 from Account A to Account C. Confirm the transfer posts to Account C within the expected timeframe. Note the actual posting time, as this is the transfer speed your automation will operate at. Transfer it back to Account A after confirming.
Verification check: Account C linked to Account A, test transfer completed and confirmed in both directions, transfer speed noted. ✓
Step 4: Migrate Autopay to Account B (Days 7 to 10)
This is the most time-consuming step and the one most people underestimate. Every fixed bill currently autopaying from Account A needs to be updated to draw from Account B instead. Do them one at a time in order of next due date, not all at once.
For each biller: log in to the biller's payment portal, update the payment account to Account B's routing and account number, confirm the update, and note the confirmation number or screenshot the confirmation page. Wait for the next payment to process from Account B before updating the next biller. This gives you one confirmation that the update worked before depending on it for all bills simultaneously.
Common billers that require extra attention: rent or mortgage (often require a voided check rather than routing and account number), insurance providers (may require a phone call rather than online update), and loan servicers (may take one to two billing cycles to fully update).
Verification check: All fixed bills updated to Account B, at least two billing cycles confirmed pulling from Account B without any drawing from Account A. ✓
Step 5: Set Up Automated Transfers (Day 10 to 11)
With all autopay migrated and confirmed, set up the two recurring transfers that make the system run automatically.
Transfer 1 — Account A to Account B: Schedule a recurring transfer equal to your monthly fixed obligations divided by number of pay periods. If paid biweekly and monthly bills total $2,400, transfer $1,200 per payday. Set the transfer date to one business day after your expected deposit date.
Transfer 2 — Account A to Account C: Schedule a recurring transfer equal to your savings contribution per period. If saving $400 per month and paid biweekly, transfer $200 per payday. Set this transfer to execute the same day as Transfer 1.
Allow the first automated cycle to run and verify both transfers executed on schedule, posted to the correct accounts, and left Account A with the expected spending balance. If any transfer fails, identify the failure cause before the next cycle.
Verification check: Both transfers executed on the expected date, posted to the correct accounts, spending balance in Account A reflects expected remainder. ✓
Step 6: Configure Alerts (Day 11)
Set the following alerts across all three accounts before considering setup complete:
Account A (spending): Low-balance alert at buffer amount plus 30 percent of spending allocation. Transaction alerts for any charge above $50. Transfer confirmation for both outgoing transfers on payday.
Account B (bills): Low-balance alert at buffer amount plus $100. Transaction alert for any charge that is not a recognized autopay. Alert if the incoming transfer from Account A does not post by the expected date.
Account C (savings): Balance update after any transfer posts. Alert for any withdrawal, which should be rare by design.
Infrastructure complete. Now build the rest of the system.
With your accounts set up and money moving automatically, the Financial Automation hub shows you how to add budget automation, savings goals, debt payoff, and investment contributions on top of this foundation.
Explore the Financial Automation Hub →More From Banking Infrastructure for Automation
The 3-Account System That Fixes Money Chaos — The complete framework: which accounts to open, where they live, and how money flows between them
Bills Account vs Spending Account: The Correct Setup — The exact configuration for each account and how to keep them from bleeding into each other
Where Your Paycheck Should Land First — The income landing account strategy that makes every automated transfer fire correctly
How to Build a Buffer Account That Prevents Overdrafts — The cash cushion that keeps automation running when timing does not align perfectly
Best Bank Features for Automation — What to look for in a bank before you build your automated system on top of it
You are here: How to Set Up Your Bank Accounts So Money Moves Without You
The Right Number of Bank Accounts for Full Automation — How many accounts you actually need and when adding more helps versus hurts
Why Your Checking Account Is Sabotaging Your Automation System — The specific checking account errors that silently break every automated system
Resources
CFPB — Bank Account Consumer Tools and Resources
FDIC — Consumer Protection and Deposit Insurance
FDIC BankFind — Verify Institution Insurance Status
This article is part of the Financial Automation hub on PersonalOne — a complete framework for building financial systems that run without daily decisions.
Frequently Asked Questions
How long does the full setup take?
One to two weeks of elapsed time with approximately two to three hours of active work. Most of the elapsed time is waiting for account verification (two to three business days for micro-deposits at the savings institution) and waiting to confirm that autopay migrations worked correctly before migrating the next biller. The active work is spread across several short sessions rather than one long one.
What if a biller does not allow online autopay updates?
Call the biller directly and request the payment account update over the phone. Confirm the representative's name and a confirmation number. Follow up with a written record of the conversation. Some billers — particularly older loan servicers and landlords — require a voided check rather than account numbers entered online. Have Account B's routing and account number on hand and be prepared to provide a voided check from that account if needed.
Should I close my old savings account after opening the new one?
Not immediately. Keep both accounts open for at least 60 days after the new savings account is fully operational. Confirm that all automated contributions are flowing correctly to the new account and that no linked services are drawing from the old one. Then close the old account and request written confirmation of closure. Early account closure fees apply at some banks if the account is less than 90 to 180 days old.
What monthly maintenance does the system need after setup?
One 15 to 20 minute monthly review: confirm both automated transfers executed on schedule, check Account B for any unrecognized charges or missed autopay updates, verify the spending account balance reflects the expected remainder after transfers, and confirm Account C received its contribution. Quarterly, review the transfer amounts against any bill changes and adjust if needed. After a major life change — new job, move, new debt, debt payoff — review immediately.
Disclaimer: This content is for educational purposes only and does not constitute financial advice. Banking features, account opening processes, and transfer capabilities vary by institution. Always verify current terms with your bank or credit union before making changes to your banking setup. FDIC insurance covers up to $250,000 per depositor per institution.